|
Introduction & History
by Gary Clark
The "Sport" climbing area a few miles north of the northern
New Mexico village of El Rito was first announced to the world by Rich
Strang in a Rock & Ice Magazine Mini-Guide in April of 1998. Rich,
his brother Ed, Lance Hadfield, Jean Delataillade, Lee Sheftel, Walt Wehner,
and others had spent an aggressive period of development by that time
after Ed Strang's initial discovery of the potential of these crags, located
just a few miles from the El Rito Trad area. Climbing had been going on
at the latter for many years, but its popularity was limited by the lack
of challenging routes, since the cliffs are considerably less than vertical
on average. Northern New Mexico, although generally mountainous, is not
blessed with an abundance of quality steep rock. Thus it was exciting
news to the local climbing community when a new area came on the scene
that was a reasonable day trip from Albuquerque, Taos, Santa Fe, and Los
Alamos, and had the potential for high quality, difficult routes.
The rock here is geologically identical to the trad area - a conglomerate
matrix of metamorphosed sand and mud with inclusions of smooth, rounded
cobbles of all sizes. The cobbles, and the holes they leave when they
fall out of the matrix, form excellent holds that allow relatively moderate
climbing for such steep rock. Fully overhanging routes can be below 5.11,
and anything less than vertical will probably clock in at 5.8 or below.
All routes are sport bolted, so you can concentrate on the climbing instead
of the protection.
|
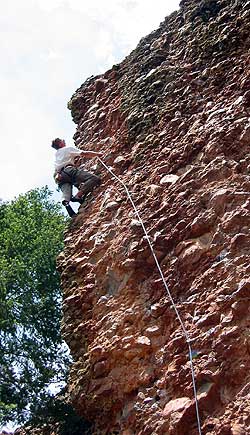
The author on "Procrastination"
5.11d, "Rad Wall" |
|
The routes listed in Strang's 1998 guide were mostly toward the upper
end of the difficulty scale, because this level of climbing most interested
these skilled climbers. The "golden age" of development ended
shortly after publication of the guide, and the route count remained almost
static for the next 5 years. At the onset of the summer of 2003, I decided
to take a break from repeating the same routes over and over. The area
had a dearth of moderate (5.10 and below) routes, and I quickly discovered
that many of the blank areas provided that level of climbing. I have little
doubt that this fact led to them being ignored by the original developers.
So far I've put up 14 new moderate routes with the
assistance of my wife, Lynn. Five years of use was starting to make its mark on the anchors. The
original anchors were of highly variable quality, depending on the experience
level and budget of the developer. Cheap cold shuts (usually welded, but
not always) were the norm. Although those of the welded variety are certainly
strong enough when new, after hundreds (or perhaps even thousands of climbers)
had been lowered from them, some were worn nearly halfway through. On
one popular climb there were two badly worn shuts, with one of the anchor
bolts so loose it could be wiggled with the fingers. Although so far only
a serious problem for the most popular routes, it was clear that something
should be done so all the anchors didn't end up as ticking time bombs.
Marginal protection bolts are one thing, but we are all dependent on good
anchors to remain alive in this sport. So far we've replaced or upgraded
about 2/3 of the anchors. Routes with improved top anchors are marked
on the route list. For all others bring extra draws, slings, and/or daisy
chains.
If you are really serious about preserving anchors at this or any sport
area, there is a simple solution - clip your own draws or slings to the
fixed anchor, and do all your lowering and top-roping from them. The last
person up can then pull up half the rope and rappel from the fixed hardware.
This practice, if commonly employed, would extend anchor life almost indefinitely.
However, this solution has been recognized for a long time, but without
widespread adoption. The alternative of putting up cheap steel carabiners,
and simply replacing them every 5 or 10 years seems like the most practical
solution, and it makes the climbing that much more efficient and enjoyable.
One simple thing you can do to help is to keep your ropes clean. The wear
produced on anchors is largely due to dirt and grit in the ropes, not
the ropes themselves. Throw your ropes in the washing machine with a mild
soap every five or six uses, and air dry them - don't believe myths you
may have heard that ropes can be weakened by washing.
|
|
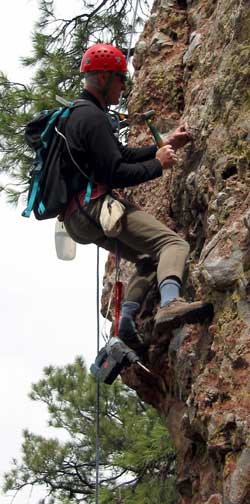
Setting a bolt on "Super Arete"
|
Developing Routes at El Rito
by Gary Clark
Beginning with the original Strang guide, the message has been promulgated
that there are hundreds of quality lines waiting to be developed. Many
of these were supposedly to the north on the broad wall that was virtually
ignored by Strang and company, and only scratched by Wehner and friends.
The name "Walt's Wall" was given to this section by Strang,
because Walt Wehner was the only one who seemed to have much interest
in developing it. The vast potential for development is a myth. Although
there is considerable rock to the north, a lot of it is substandard, or
simply doesn't offer the prospect of a continuous, quality climb. From
our explorations, we have concluded there are very few good prospects left
on Walt's Wall, and not that many more in the entire area. This area may
eventually see a ceiling of around 70 routes. I believe that routes beyond
that count will be either contrived, closely packed, or of low quality.
I could be wrong, but I've looked pretty hard.
If developing routes, you should be experienced in installing top anchors
and protection bolts in hard rock. Try to avoid drilling in the soft red
matrix material between cobbles, especially for top anchors - a few of
these have already become loose. Bolts in cobbles are much stronger than
bolts in the matrix if and only if the cobble itself is firmly embedded.
Looks can be deceiving. Hammer vigorously on the cobble you intend to
drill; if it emits any kind of sound other than a solid "thunk",
avoid it. If good placements are not available where you'd like the top
anchors, look higher, and extend with chains. Unfortunately, drilling
these ancient, extremely hard stones will dull a carbide drill bit after
only one or two holes, so you'll need a diamond bit sharpening machine
back home.
|
|
To install a route you will need: a power impact drill, lots of battery
power (I use two motorcycle batteries wired in series), 4-6 sharp bits,
a hammer, wrench, blow tube, and all the hardware you'll install on the
wall. This will not make for a light pack on the hike up to the crags.
It will, however, make your wallet lighter; expect to invest about $35
in a typical 6-bolt route, not counting wear on your ropes, drills, and
other gear. Your return on investment is the satisfaction of contributing
something to the climbing community.
The top-anchor improvement project was paid for by a grant from the Los Alamos Mountaineers Club. All route development was funded from the developer's pockets.
I place two hardware-store steel carabiners on chains on the top anchors
of my routes so users can spend their time climbing instead of hanging,
and won't run the risk of falling to their deaths if they make a mistake
when tying back into the rope. These "spring clips," as they
are called in the hardware industry, are made from 3/8" diameter
steel rod. They are very strong, can be replaced without tools when they
wear thin, and are relatively cheap at under $3 apiece.
|
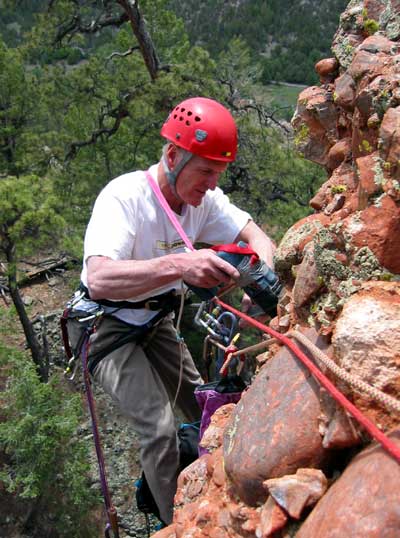
Drilling a new top anchor on the
"Resurrection" route.
|
The most common original anchor
at the area was welded (sometimes open) cold shuts fixed with Rawl bolts.
This is not acceptable, because the bolts must be chopped and new holes
drilled when the shuts become worn, which can be only a few years on popular
routes. If you can't afford anything but welded shuts, at least use stud-type
bolts with exposed, removable nuts. Think ahead so no new holes will ever
be needed. Never place aluminum carabiners on top anchors - they wear out
very quickly. For the highest quality, use stainless steel throughout.
|
|